
Mobile applications have become must for all scale businesses...
Call +91 - 9410432378

Create Your First VM Instance for Google Cloud Platform
Jul 24, 2018
fizikamind
This article helps you to create your first VM instance for Google Cloud Platform Compute Engine. In this article, we will cover following key points.
- How to create a Compute Engine VM Instance for Google Cloud Platform?
- How to Reserve a Static IP?
- How to Create a DNS Record for Custom Domain?
- Point your Custom Domain to Compute Engine VM Instance. Add Name Servers?
- How to install Apache and PHP in Compute Engine VM Instance?
- How to install MySQL in Compute Engine VM Instance?
- Secure MySQL Database Server?
So, we need to cover lots of things in this article so let’s start with creating our first Compute Engine VM Instance
How to create a Compute Engine VM Instance for Google Cloud Platform?
Before starting we are assuming you already have an account for https://cloud.google.com. If not, feel free to create one. Google provides one year trial with $300 credits. You only need a working Credit Card for the trial account.
If you already have an account and logged in visit https://cloud.google.com and then click on “Go To Console” button.

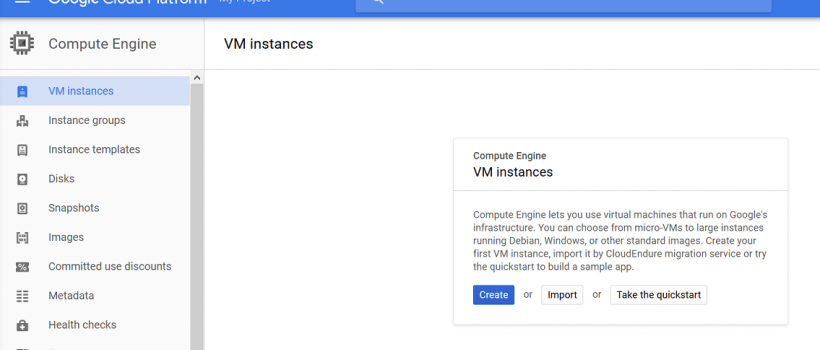
From the left menu Click on Compute Engine then VM Instance.
Note: Here we are trying to install manual/y. So, we are not using Cloud Launcher. For Cloud Launcher you can refer to this article.

Now click on Create Instance to create your first Compute Engine VM Instance as shown in the below image.

Now we need to provide below information for our new VM Instance.
Name: Our VM Instance. But Name must start with a lowercase letter followed by up to 63 lowercase letters, numbers, or hyphens, and cannot end with a hyphen.
Zone: You can select a zone based on your visitors. Based on zone your VM cost may vary. The zone determines what computing resources are available and where your data is stored and used.
Machine Type: Select a number of CPUs and Memory. Based on your selection VM cost may change. But for our first VM i am fine with default settings with 1 CPU and 3.75 GB RAM or Memory. You can explore the advanced option to select GPUs if applicable.
Boot Disk: Select your Boot Disk OS and Size. You can also select your Boot Disk Type SSD or standard Hard Disk. For this article, we are going to select Ubuntu 17.10 with Hard Disk Size 40 GB (no SSD).
You can check all available options in this article.
Identity and API access: For our first VM we are not going to change this option. But we are going to learn about it in our other articles.
Firewall: For firewall we are going to enable both HTTP and HTTPS request. By default all incoming traffic from outside a network is blocked.
Finally, once you done click on Create Button. Below is the Image options we selected for Our First VM Instance.

Once you clicked on Create Button it will take some time for your VM to launch. Below image shows the output when our VM is created successfully.

How to Reserve a Static IP?
Once our VM Instance is ready and launched. It assigns with External IP address. Using External IP address visitors can access our website. So, prevent it to change, for this we need to reserve a static it. Now we will reserve an External IP address for our new VM Instance. Follow below steps to reserve static IP.
For this we need to first open left menu, then scrolls and search for VPC network -> External IP address under Networking. Refer below image for more detail.

Now we need to convert our Ephemeral IP to Static IP. In dialog box provide a valid name and description (optional). Refer image for more detail.

How to Create a DNS Record for Custom Domain?
For creating DNS records or entries we need to open Network Services -> Cloud DNS under NETWORKING section in the left menu.

Once its open click on Create Zone

Next, we need to provide information for our DNS Zone. We need to provide below information for our DNS Zone
Zone name: Identifies a DNS zone for the project. Must be unique in the project.
DNS name: The DNS name suffix of the zone
Description (optional): But provide use full information about your DNS Zone.


Once our DNS Zone is created we need to add A record for our Domain. For this click on Add a record set blue button shown in the above image. On the new window, we need to create “A” record with our static IPv4 Address of VM instance, which we created in Step 2 How to Reserve a Static IP? Section. Refer below image for more details.

Above record is pointing our vlemonn.in traffic to our Google Cloud Platform Compute Engine VM instance. Now we need to redirect www.vlemonn.in traffic to our server for this we are going to add CNAME records as shown in the below image.

Now it’s time to change our domain name servers. We need to use below name servers
- ns-cloud-a1.googledomains.com.
- ns-cloud-a2.googledomains.com.
- ns-cloud-a3.googledomains.com.
- ns-cloud-a4.googledomains.com.
Point your Custom Domain to Compute Engine VM Instance. Add nameservers
For adding name servers, we need to open Domain Control Panel. For me, it from “Bigrock.in”. The below image shows the final step for more details steps you need to check this article.

We are almost ready to install Apache. We covered DNS and Static IP first we because name server changes will take some time to reflect for the domain. Now we are going to visit of server IP address then the server is not able to handle our http or https request. For this we need to install Apache.

How to install Apache in Compute Engine VM Instance?
Now it’s time to open our Compute Engine VM instance SSH terminal. For this open Compute Engine -> VM Instance. Click on drop down as shown in the image.


Above is the SSH terminal for our Compute Engine VM Instance. We need to execute all terminal commands in above browser window. To install Apache and PHP in our Google Cloud Platform Compute Engine VM Instance we need to execute below commands.
sudo apt-get update
sudo apt-get install apache2 php libapache2-mod-php
It’s time to re-test our site. Visit http://<your-server-ip> or if you configured your domain use your domain. Your domain may not work yet. If your domain not working, try to use server External IP. You will see below output.

Our Google Cloud Compute Engine VM Instance is finally Up and running with Apache2. Now the last thing in this article we are going to Download and Install MySQL.
How to install MySQL in Compute Engine VM Instance?
For installing MySQL, we need to execute below commands.
sudo apt-get update
sudo apt-get install mysql-server
During the installation, we need to enter the root password. Enter a strong and secure password remember it. We need root password later for all MySQL administrative operations.

Now it’s time to make our MySQL Server installation secure for this we are going to execute below command. After executing the below command, we need to enter our root password for all the question type Y except root password if you want to change it press Y else N. Below image shows all the output.
mysql_secure_installation

Finally, it’s time to test our MySQL Server Database. Use below command to test MySQL
systemctl status mysql.service
You watch all above steps in action in this video.
FIZIKA MIND
MSME Regg UAN UP15D0006259
UDYAM-UP-15-0011360
GeM Seller Id: 4885200001235542
Payment Information
A/c Name: FIZIKA MIND
A/c No: 53320200000435
IFSC : BARB0KUDESI
Website Developed by me
Contact us
Get in touch with us
FIZIKA MIND
Best website developer in bareilly
Education - This is a contributing Drupal Theme
Design by WeebPal.
Design by WeebPal.